Content Types
Overview
As each website is different, we allow you to define your types of content to use with Front Matter. Front Matter will adapt the metadata fields to show in its editor panel depending on the type of content.
Front Matter comes with a default content type definition which you can adapt to your needs or add your types next to it.
How it works
Behind the scenes, Front Matter uses the frontMatter.taxonomy.contentTypes setting to understand which type of content you'll use for your website.
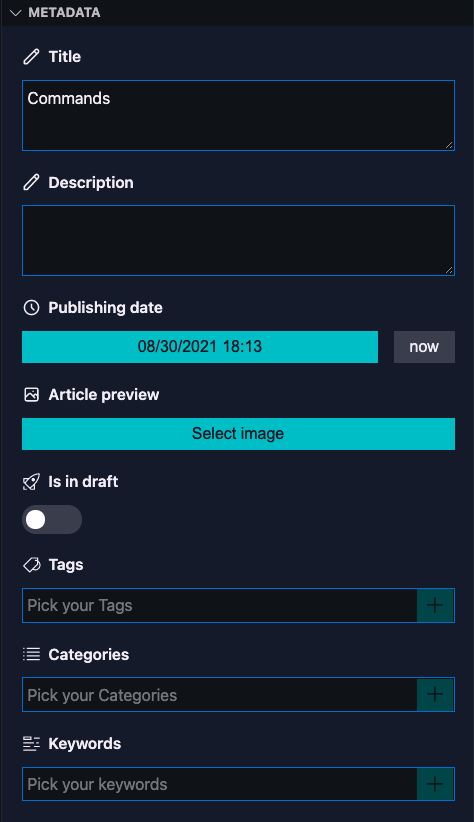
Our default content type consists of the following fields:
- title:
string - description:
string - date:
datetime - preview:
image - draft:
draft - tags:
tags - categories:
categories
Info: The default content type will create an individual Markdown file when creating content. If you want to use page bundles, make sure to specify this on the content type level.
We'll use the default one when you start writing your markdown content, and no other content type is defined.
Changing the default content type
If you want to change the default content type, open your frontmatter.json and write an entry for the frontMatter.taxonomy.contentTypes setting. Visual Studio Code will automatically autocomplete it with the default content type fields.
If in some case it wouldn't do this, here is the default content type structure:
"frontMatter.taxonomy.contentTypes": [
  {
    "name": "default",
    "previewPath": null,
    "pageBundle": false,
    "fields": [
      {
        "title": "Title",
        "name": "title",
        "type": "string"
      },
      {
        "title": "Description",
        "name": "description",
        "type": "string"
      },
      {
        "title": "Publishing date",
        "name": "date",
        "type": "datetime"
      },
      {
        "title": "Article preview",
        "name": "preview",
        "type": "image"
      },
      {
        "title": "Is in draft",
        "name": "draft",
        "type": "draft"
      },
      {
        "title": "Tags",
        "name": "tags",
        "type": "tags"
      },
      {
        "title": "Categories",
        "name": "categories",
        "type": "categories"
      }
    ]
  }
]
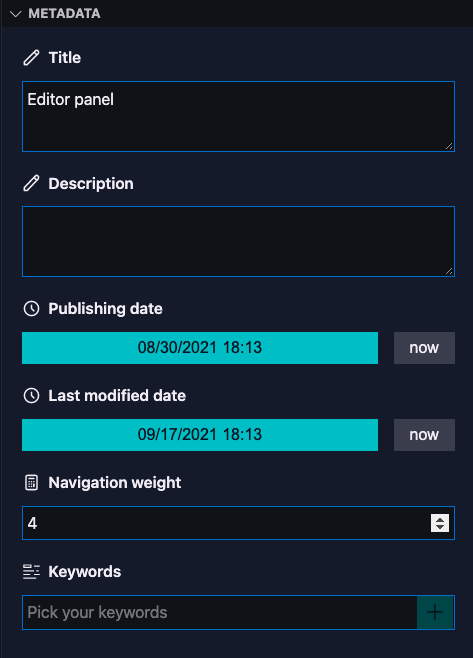
Adapt the fields to your needs. For our documentation it looks as follows:
"frontMatter.taxonomy.contentTypes": [
  {
    "name": "default",
    "previewPath": null,
    "pageBundle": false,
    "fields": [
      {
        "title": "Title",
        "name": "title",
        "type": "string"
      },
      {
        "title": "Description",
        "name": "description",
        "type": "string"
      },
      {
        "title": "Publishing date",
        "name": "date",
        "type": "datetime"
      },
      {
        "title": "Last modified date",
        "name": "lastmod",
        "type": "datetime"
      },
      {
        "title": "Navigation weight",
        "name": "weight",
        "type": "number"
      }
    ]
  }
]
The metadata section on the editor panel will render the following fields:
Content type properties
For the content type you can configure the following properties:
name (string): Name of the content typefields (Field[]): Check the supported field typespageBundle (boolean): Specify if for the content a folder will be created. Default:false.previewPath (string): Defines a custom preview path for the content type. Default:null. When the preview path is not set, the value from the frontMatter.preview.pathName setting will be used.
Define your own type
In most cases, you'll work with multiple types of content where each type will have its defined set of fields. If this is the case for your website, you'll need to add another content type to the frontMatter.taxonomy.contentTypes setting.
Instead of overriding the default content type, you can also define a new content type. It requires you to specify the name and fields.
Important: The
nameproperty value needs to be equal to thetypevalue you set in your Markdown front matter. You best define it via a template so that it's always defined. A default template will be available when initializing Front Matter in your project in the.frontmatter/templatesfolder.
Sample:
"frontMatter.taxonomy.contentTypes": [
  {
    "name": "default",
    "fields": [
      ...
    ]
  },
  {
    "name": "documentation",
    "fields": [
      ...
    ]
  }
]
In the sample, documentation is used as the content type name. This means that in your article, you'll need to add the type: documentation to your front matter to let the editor panel understand which fields to show.
---
title: Content Types
slug: content-types
description: null
date: '2021-09-17T07:36:26.654Z'
lastmod: '2019-08-22T15:20:28.000Z'
weight: 4
type: documentation
---
Supported field types
Front Matter its metadata section supports the following fields:
stringnumberdatetimebooleanimagechoicedraft: specifies the kind of draft field you want to use:booleanorchoice. This field, can be configured with the frontmatter.content.draftfield setting.tags: mapped to the tags defined in your settings.categories: mapped to the categories defined in your settings.taxonomy: if you want to define your own custom taxonomy fields.
Custom draft field
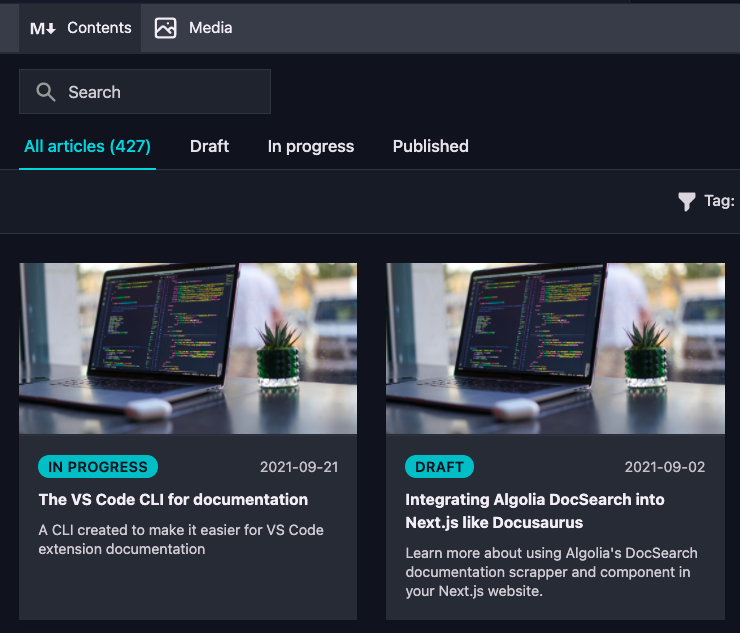
By default, the draft field is a boolean field. If you want to use your own status values, you can configure it via the frontmatter.content.draftfield setting.
Sample of custom draft field with:
"frontMatter.content.draftField": {
  "name": "draft",
  "type": "choice",
  "choices": ["draft", "in progress", "published"]
}
When using a custom draft status, the content dashboard will make use of it as well:
Field properties
A field consists out of the following properties:
title (string): The title to show in the metadata section (optional);name (string): The name of your field, will be used to set in the front matter of your Markdown file;type (field type - string): One of the above supported types.hidden (boolean - optional): Specifies if you want to hide the field from the metadata section, but still have it available in Front Matter.
Additional properties
String fields
single (boolean): When you picked thestringfield type, you can specify if it is a single line. By default it will render as a multiline field (optional).
Image fields
isPreviewImage (boolean): Allows you to specify a custom preview image for your article. When you set this totruefor an image field in your content type, it will be adopted in the dashboard.multiple (boolean): Define if you want to allow to select multiple images. By default this isfalse.
Important: You can only set this on one image field per content type.
Choice fields
choices (string[] | { id: string; title: string; }): When you picked thechoicefield type, you need to return an array of choices.multiple (boolean): Define if you want to allow multiple choice selection. By default this isfalse.
Example of using an array of string values:
{
  "title": "Choice",
  "name": "choice",
  "type": "choice",
  "choices": [
    "",
    "Choice 1",
    "Choice 2",
    "Choice 3"
  ]
}
Example of using an array of { id: string; title: string; } objects:
{
  "title": "Choice",
  "name": "choice",
  "type": "choice",
  "choices": [
    { "id": "1", "title": "Choice 1" },
    { "id": "2", "title": "Choice 2" },
    { "id": "3", "title": "Choice 3" }
  ]
}
Custom taxonomy field
taxonomyId: The id of the taxonomy you want to use, it will need to be defined in thefrontMatter.taxonomy.customTaxonomysetting.
Example of a custom taxonomy field definition:
{
  "title": "Custom taxonomy",
  "name": "customTaxonomy",
  "type": "taxonomy",
  "taxonomyId": "customTags"
}
The frontMatter.taxonomy.customTaxonomy setting allows you to provide a list of custom taxonomy data. Each of the taxonomy data contains a id and an array of options.
Here is an example of the custom taxonomy setting definition:
"frontMatter.taxonomy.customTaxonomy": [
  {
    "id": "customTaxonomy",
    "options": [
      "Option 1",
      "Option 2",
      "Option 3"
    ]
  }
]
Preview path
When you want to show the live site/page previews in Visual Studio Code, you can specify a custom preview path/prefix. For instance, if you create blog articles, and you want to prefix it with blog/2021/11, you can set this with the previewPath property.
There are two ways to set this:
- Via the global frontMatter.preview.pathName setting. This will be used as the default value for all content types.
- Define a path per content type can be done via the
previewPathproperty. Once set, it will ignore thefrontMatter.preview.pathNamesetting.
Important: As the value will be formatted with the article's date, it will try to convert all characters you enter. In case you wan to skip some characters or all of them, you need to wrap that part between two single quotes. Example:
"'blog/'yyyy/MM"will result in:blog/2021/11.
"frontMatter.taxonomy.contentTypes": [
  {
    "name": "default",
    "previewPath": "'blog/'yyyy/MM",
    "pageBundle": false,
    "fields": [
      ...
    ]
  }
]
Page and leaf bundles
The page or leaf bundles, are a way to group your pages and resouces together in a single folder.
content/
├── about
│   ├── index.md
├── posts
│   ├── leaf-bundle
│   │   ├── image1.jpg
│   │   ├── image2.png
│   │   └── index.md
│   └── leaf-bundle
│       └── index.md
│
└── another-section
    ├── ..
    └── leaf-bundle
        └── index.md
In the above section you can see the leaf-bundle folders. These bundles consist of a index.md file and possibly also the resouces related to it like images.
By default, Front Matter will create individual Markdown files, but you can also create a leaf bundle. In order to do so, you need to set the pageBundle property in your content type to true.
Here is an example of configuring the page bundles for the default content type:
"frontMatter.taxonomy.contentTypes": [
  {
    "name": "default",
    "pageBundle": true,
    "fields": [
      ...
    ]
  }
]
Creating a template
To make sure that your type of content is already defined when creating a new Markdown file. It will be easier to set the type of content within a template.
You can create Markdown templates in your project's .frontmatter/templates folder (or defined differently).
---
title:
slug:
description:
date: 2019-08-22T15:20:28.000Z
lastmod: 2019-08-22T15:20:28.000Z
weight: 1
type: documentation
---
If you already have an existing page, you can automatically create a template from it by running the Front Matter: Create a template from the current file command.
The create template command will ask you the template's name and if you want to include the content. The front matter data is included by default.
Feedback
Do you want to provide feedback about this page/content?
Provide feedbackDid you spot an issue in our documentation, or want to contribute? Edit this page on Github!


